This lesson shows how to prepare ManagePLUS Gold and the classes list for working with allocations to cost centers and profit centers.

Enabling the allocation features

ManagePLUS Gold’s allocation features include extra columns added in the Chart of Accounts and Classes windows, extra reporting options,  and so on. The features can be enabled, or can be hidden for users who don’t need them. To enable the allocation features:

1. Click the Allocation button in the toolbar, or choose View > Allocation features from the main menu.

ManagePLUS for QuickBooks tlbar main allocation 13. Getting started with allocation

The Allocation features dialog will open:
2. Check mark Enable allocation features if it is not check marked already.
3. Click OK to close the dialog.

Identifying classes as cost centers or profit centers

Before you can allocation anything you must have something to allocate to:  ManagePLUS Gold only lets you set up allocation formulas which have a cost center or profit center class as the “destination” for the allocation. So you must identify some classes as cost centers and/or profit centers.

ManagePLUS for QuickBooks starblue 13. Getting started with allocation The “whats” and “whys” of identifying cost centers and profit centers of your business are beyond the scope of this Help system. Those choices are highly individualized and depend on how you see the parts of your business as working together, plus the kinds of management information you seek.
1. Select or open the Classes tab.
2. Click in the Alloc type column on the desired class row. (See the illustration below.)

 A down arrow will appear.

3. Click the down arrow, then select the desired type from the drop-down list.

 This illustration shows the Cattle class being identified as a profit center.

ManagePLUS for QuickBooks qsidentifycattleaspc 13. Getting started with allocation

ManagePLUS for QuickBooks starblue 13. Getting started with allocation Pop-up glossary definitions: stocker, heifer, steer.

 When you choose an allocation type for any class, all parent and child classes within the same branch of the class tree get assigned that type. In other words, a profit center class can only have profit center subclasses, and a cost center class can only have cost center subclasses.

4. Choose a type for each of the classes you want to set up as a cost center or profit center.

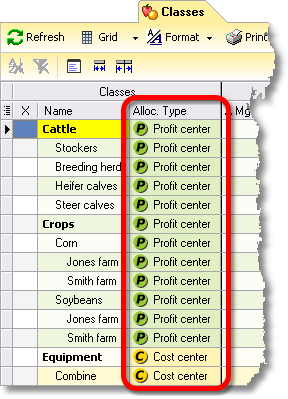
 For this lesson, choose the following types in the ManagePLUS Farm Example class list:

ManagePLUS for QuickBooks qsclasslistwithalloctypesassigned 13. Getting started with allocation

The reason why you must identify cost centers and profit centers this way is that it lets ManagePLUS Gold automate some calculations which otherwise could not be automated, and to make allocation more “user friendly” (prevent certain kinds of allocation errors).

ManagePLUS for QuickBooks starblue 13. Getting started with allocation In your own classes list, you do not have to identify every class as either a cost center or profit center—you may leave some of them set to the None type. (You may have some classes which are unrelated to this kind of management information gathering.)

See also:

Working with Cost Centers, Profit Centers, and Allocation in How-To Procedures

13. Getting started with allocation