|
Filtering means to limit the display to records to those which contain what you want to see—such as a specific range of transaction dates, a certain person’s name, or all transactions for a certain class.
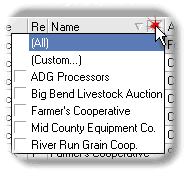
Using the column’s filtering button and drop-down menu Grid columns which support filtering (not all of them do) display a filtering button along the right side of the column heading when you hover the mouse cursor over it. You can use the filtering button’s drop-down menu to limit the grid to showing only rows which have certain data values in that column.
| · | To filter a grid, click on a column’s filtering button to display a drop-down menu of data values available for the column, like the one shown at right. Then check mark any items in the list, to have the grid show only those items.
|
For example, if we check mark Mid County Equipment Co….

|

|
The grid will then only display transactions for that vendor:

You may apply filters to as many columns as you wish.
| · | To un-filter the grid click on the column’s filtering button again, but this time select the (All) item at the top of the list: (If you have filtered several columns, you must reset each of them in this way to remove all filtering.)
|

Or, you may remove or delete the filter in the filter panel, which is described next. Using the filter panel After you’ve applied a filter as described above (i.e., by using a column’s filtering button), a filtering panel opens at the bottom of the grid. It displays the filter condition(s) you currently have set and gives you several ways to control them. Here’s a description of the controls and information in the filter panel:
|

|
Deletes the filter. |
|

|
Toggles between applying and removing (disabling) the filter, but does not delete it. |
|


|
Clicking either the filter description or the down-arrow graphic to the right of it, displays a drop-down list of the filter’s parts, letting you choose to apply only part of the filter if you want. |
|

|
Opens a dialog window which lets you edit the filter, create more complex filters, etc. |
Most of these items are self-explanatory, but the Customize button needs a bit more explanation. Clicking it opens a Filter builder dialog, which lets you control and modify each part of the filter. Here’s an example, in which the Name column has been filtered so that only transactions for ADG Processors and Mid County Equipment Co. will be displayed.

| · | The  button beside each filter condition lets you change its relationship to the other filter conditions (i.e., whether they have an AND or OR relationship). button beside each filter condition lets you change its relationship to the other filter conditions (i.e., whether they have an AND or OR relationship).
|
| · | Clicking any underlined item allows you to change it. For example clicking on Name in either the lines where it appears let’s you choose a different column for the filter condition. Likewise, clicking on equals lets you change the condition to values like “does not equal”, “is less than”, “is greater than”, etc.
|
| · | The  button and the button and the  buttons let you add new filter conditions and change the logic and structure of the filter. buttons let you add new filter conditions and change the logic and structure of the filter.
|
 | These advanced filtering features are for experienced users. We won’t be providing instructions about how to use them here. However, you can’t hurt anything by trying—feel free to experiment.
|
|

|
You can filter grouped columns too!
Column headers in the grouping panel respond to filtering commands the same as if they were still in the grid. You can perform all of the filtering commands described in this topic on column headings in the grouping panel.
|
|


